


–
Many of you asked me how I do my nails, so here is a tutorial.
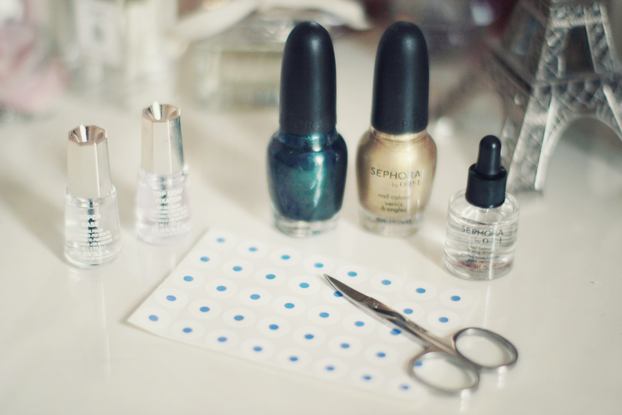
What you’ll need: Base + top coat ( Mavala ), two nailpolish, drying drops ( opi ), paper hole stickers.
Now let’s get it started, it’s easier than you think, you’ll see !
–
Beaucoup d’entre vous m’ont demandé comment réaliser ma manucure, voici donc un petit mode d’emploi.
Ce dont vous aurez besoin: Base + vernis protecteur ( Mavala ), deux vernis de votre choix, gouttes asséchantes ( opi ), et des œillets ( en papeterie ).
Vous allez voir, c’est moins compliqué qu’il n’y parait !
–
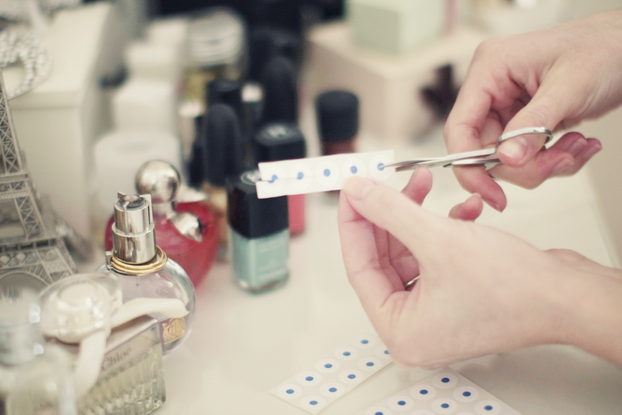
Step 1 : Cut five paper hole stickers in two / Coupez cinq Å“illets en deux.
–
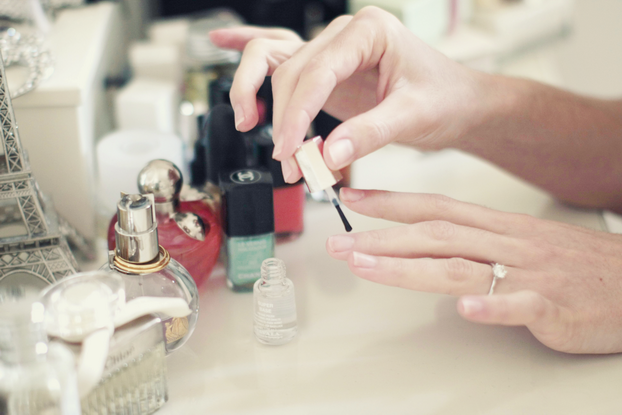
Step 2 : Apply the base / Posez la base.
–
Step 3 : Aply the first nailpolish, then let it dry / Posez le premier vernis, puis laissez sécher.
–
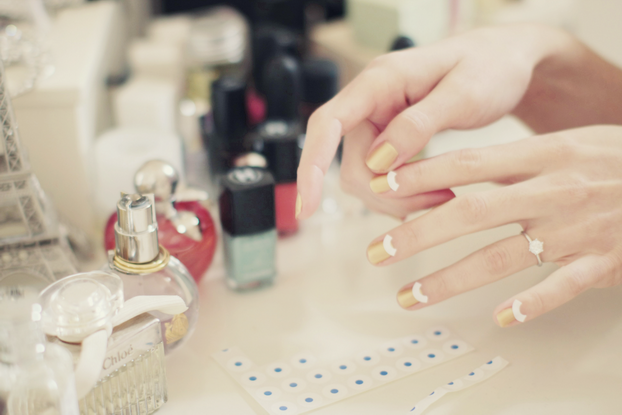
Step 4 : When dry, apply stickers on each nails / Lorsque c’est sec, posez les oeillets sur chaque ongle.
–
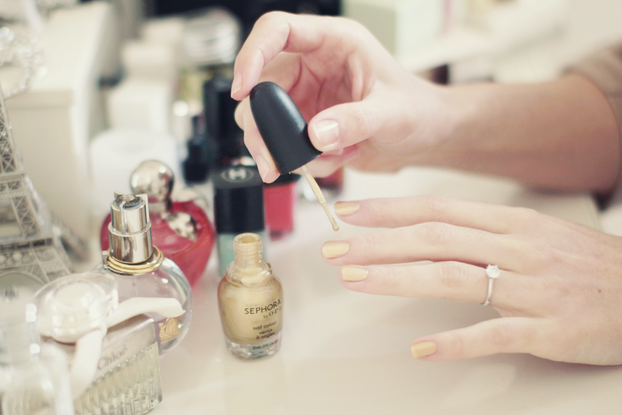
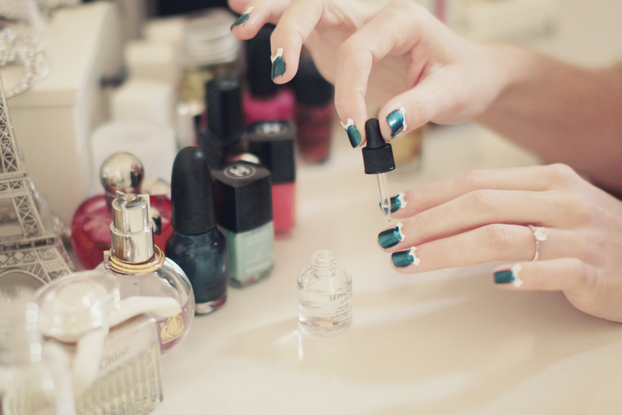
Step 5 : Apply the second nailpolish (generally once is enough ) / Posez le second vernis ( en général, une couche suffit ).

–
Step 6 : A few drying drops, so it would dry just in a few seconds ! ( I can’t live without it now ) / Quelques gouttes asséchantes, pour des ongles secs en quelques secondes! ( Je ne peux plus m’en passer )
–
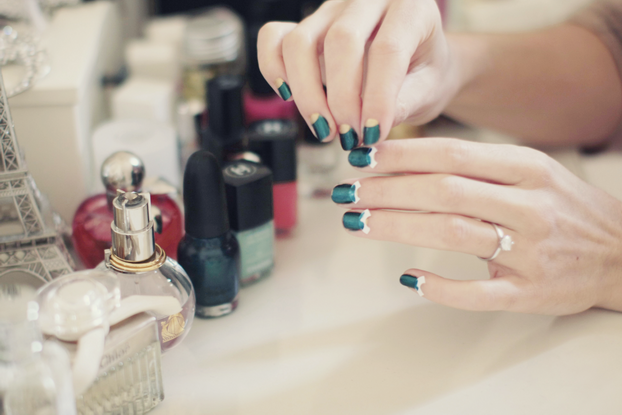
Step 7 : When dry, take the stickers off / Lorsque c’est sec, retirez les Å“illets.
–
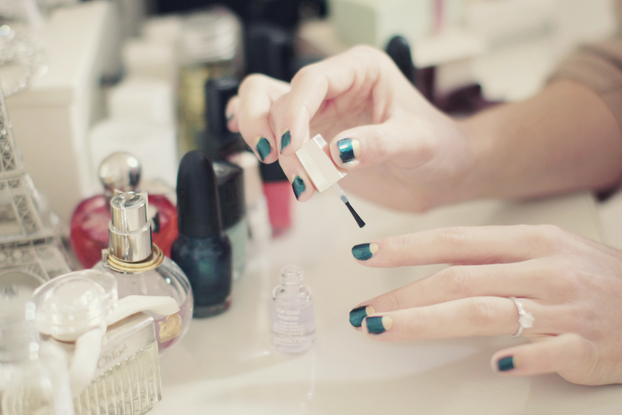
Step 8 : Apply top coat / Posez le vernis protecteur.
–
Done ! / Et voilà !

–
For a real vintage manucure, you can also skip the first nailpolish, to have just one color on the nails ( red is the classic ). The little trick comes from Louise. That makes everything easier !
Pour une vraie manucure vintage, vous pouvez également ne passer qu’une couleur ( le classique: le vernis rouge ). L’astuce vient de Louise, et cela rend tout de suite les choses plus faciles !
–
( H&M dress, Digby & Iona deer ring )
259 commentaires
Raspberry Jam le janvier 23, 2011 a 3:33 . .
LOVE IT!
Thanks for sharing!
Looks so beautiful!
http://sweetraspberryjam.blogspot.com/
XOXO
Elo le janvier 23, 2011 a 3:33 . .
C’est très joli! <3
danisha le janvier 23, 2011 a 3:34 . .
ha super truc merci!!
Gemma Cheapischic le janvier 23, 2011 a 3:35 . .
Fantastique!!!Merci Alix!!
Rosa&Carlotta le janvier 23, 2011 a 3:35 . .
how nice! thank you for sharing, I’ll try that someday :)
xx
IPOD NANO GIVEAWAY at Illustrated-Moodboard.com
.
Elodie le janvier 23, 2011 a 3:35 . .
J’adore ça! Surtout avec deux couleurs, ça me rappelle la French manicure colorée d’YSL, mais plus originale!
http://elle-yeah.blogspot.com
Letilor le janvier 23, 2011 a 3:35 . .
Original et beau résultat !
mademoiselle.audrey le janvier 23, 2011 a 3:35 . .
C’est top et je ne pensais pas que c’était si facile, merci à toi pour ce petit tuto
June le janvier 23, 2011 a 3:35 . .
C’est super ♥ !
Letilor le janvier 23, 2011 a 3:36 . .
Original et beau résultat !!
ziboo le janvier 23, 2011 a 3:37 . .
Fabuleux ! J’étais fascinée par ta manucure dans les posts précédents, j’ai hâte de pouvoir essayer ! Merci !
BEAUTYCOUNTRY le janvier 23, 2011 a 3:37 . .
maybe I’ll find the patiente to make my nails this beautiful now!! :D
Mademoiselle le janvier 23, 2011 a 3:40 . .
Merci! Je connaissais le principe mais je n’avais pas du tout pensé aux oeillets de papeterie pour réaliser la manucure! C’est vraiment une bonne idée!
Esra le janvier 23, 2011 a 3:41 . .
Wow, its simple but very effective and beautiful! Thank you for sharing!
xoxo
Esra
http://nachgesternistvormorgen.netai.net/
Everything's Better with Frosting le janvier 23, 2011 a 3:42 . .
Fantastic! What a great trick. And here I thought you were just getting them professionally done every-other-day. Thanks for sharing! ;)
Tessa le janvier 23, 2011 a 3:42 . .
That’s so cool! I’m gonna try it soon! (:
I really love your blog!! (:
Dee le janvier 23, 2011 a 3:43 . .
Brilliant! I think I need to take a trip to Sephora soon!
Cris le janvier 23, 2011 a 3:46 . .
Thank you! Appreciate it they are very nice.
Cris
http://www.bisouonline.com
angela le janvier 23, 2011 a 3:47 . .
loveee
un beso
:::::::::::::::::::::::::::::::::::::::::::::
http://www.buscandoenmiarmario.com
Pepa le janvier 23, 2011 a 3:48 . .
Thanks for the tutorial!
Anouk le janvier 23, 2011 a 3:48 . .
Thanks to share it with us!! Super post! xx
http://www.addict-to-twins.blogspot.com
Leblogdefadwa le janvier 23, 2011 a 3:50 . .
Et moi qui pensais que tu te la faisais faire par une pro. , très sympa l’astuce , merci de partager.
Sara @ Aqui le janvier 23, 2011 a 3:53 . .
Love it! Can’t wait to try it!
Laura le janvier 23, 2011 a 3:53 . .
Love the two-tone nails <3 My sisters and I wanted to attempt doing them this afternoon but we all got sooo lazy :P
MaNAa le janvier 23, 2011 a 3:53 . .
Super astuce le vernis est magnifique :)
http://manaa-is-a-dreamer.blogspot.com/
Jennifer - Stylish Clin d'Oeil le janvier 23, 2011 a 3:54 . .
Cette pose de vernis est digne du grand art!
Je n’aurais pas la patience de suivre tout ce ‘processus’… ^^
Christine @ Fanciful Vision le janvier 23, 2011 a 3:56 . .
Thanks for sharing, it’s fabulous :D x
cuteredbow le janvier 23, 2011 a 3:57 . .
Merci d’avoir répondu à cette question ! Très chouette cette astuce ! Une mode est lancée et je m’y mets dès demain !
http://cuteredbow.blogspot.com
Manu le janvier 23, 2011 a 3:57 . .
i loveeed, i want so much, how do you did this!! kiss
http://www.welovefashionrio.com
dragon fruit le janvier 23, 2011 a 3:58 . .
thats awesome! thanks so much for sharing!
xx
ww.dragonnfruit.com
Galia le janvier 23, 2011 a 3:58 . .
Ah merci merci merciii, je vais m’y mettre, c’est tellement beau!
Bises
Galia
magdalena le janvier 23, 2011 a 3:59 . .
I’m quite terrible with my nails but this looks easy enough to try.
Thanks!
Mariana le janvier 23, 2011 a 4:00 . .
I def will try it! Love how you do your nails.
Kisses.
http://www.allineedisshoes.com
Noortje le janvier 23, 2011 a 4:00 . .
wow the result looks amazing!
The Fancy Teacup le janvier 23, 2011 a 4:03 . .
Wow, thanks for the tutorial. The color swatch is gorgeous. Can’t wait to try out your instructions!
http://www.TheFancyTeacup.com
much love.
Marco le janvier 23, 2011 a 4:04 . .
The photos are perfect as usuale :)
Marc.
http://vicissitudinilombarde.blogspot.com/
Chila le janvier 23, 2011 a 4:08 . .
I just to do it with de french manicure sticks… but it doesn’t look so cool, next time i’lll try your way. THANKS! haha :)
thefashionguitar le janvier 23, 2011 a 4:11 . .
LOVELY!! I’ve a giveaway O.P.I :) Ends midnight GMT today though…
xo thefashionguitar
Zoe le janvier 23, 2011 a 4:14 . .
Fantastic! Its nice to see you give us lesser fashionistas some tips and tricks! i love your choice of colours too.
brunetteblogging.com le janvier 23, 2011 a 4:16 . .
Fun! I might try this one day, if I have enough patience :)
sunday le janvier 23, 2011 a 4:17 . .
my hands shake too much! may be i should stop drinking coffee…
NotSoLolita le janvier 23, 2011 a 4:21 . .
This is awesome. Thanks a lot for the tip! :)
Cameron le janvier 23, 2011 a 4:26 . .
Oooh this is like painting model cars (or their customized IRL counterparts), but for nails ! Je l’aime !
Closet Fashionista le janvier 23, 2011 a 4:29 . .
Oooh how fun!!! Great tutorial! :D
http://aclosetfashionista.blogspot.com/
Maggie le janvier 23, 2011 a 4:33 . .
Oh my goodness, that is so simple! Why did I never think of that? Thank you for the tip, I’ve been wanting to do this type of nail design but could never figure out how to do it evenly!
Eva le janvier 23, 2011 a 4:37 . .
I can’t wait to try this!
http://thatsjustmybag.onsugar.com/
Raghda le janvier 23, 2011 a 4:39 . .
beautiful <3
love it ..I will try But I know will not be beautiful on my hands like you
Alice No le janvier 23, 2011 a 4:48 . .
So pretty.
Thanks for sharing it.
Alice.
NOALICENO.COM
A Girl, A Style le janvier 23, 2011 a 4:50 . .
I have been admiring your gorgeous half-moon manicures of late and had myself wondered how you did it (had presumed the help of a stencil sticker), so thank you so much for sharing! Taking myself off to a newsagent for some hold stickers ASAP!
Miss B xx
http://agirlastyle.com/
Nadia le janvier 23, 2011 a 4:52 . .
Thousand thankss for the tip!
I had never thought of it, to use these stikers!
Always saw you the way you paint your nails this two color way and it wanted to have the skill and the pulse to paint mine this way!
kisses!
Gina le janvier 23, 2011 a 5:12 . .
This is great! Thanks!!
http://kimchicsisters.blogspot.com/2011/01/winter-escape-aruba.html
devorelebeaumonstre. le janvier 23, 2011 a 5:21 . .
great tutorial. they look wonderful! xx
sormui le janvier 23, 2011 a 6:10 . .
Thx for the tutorial! It is easier than it looks!
rosaspina vintage le janvier 23, 2011 a 6:13 . .
Ohh that’s right, paper hole stickers! How couldn’t I think of those? :)
I can’t live without the Opi drying drops either!
Search for J Street le janvier 23, 2011 a 6:20 . .
Your nails are fantastic, but I am dying over that stag head ring! Your jewelry always manages to be beautiful and quirky at the same time.
kate le janvier 23, 2011 a 7:40 . .
Nice I like that trick. Ha so simple too.
Colleen le janvier 23, 2011 a 8:07 . .
I love this! I’m definitely going to try this next time I do my nails. And I need those drying drops. Why did I not know those existed? I am sitting here right now, unable to use the restroom because my nails are drying. UGH!
noe dennis le janvier 23, 2011 a 8:31 . .
thnx so much for the tutorial…i’ll do it ASAP! btw you’re blog’s so cute :]
annawithlove le janvier 23, 2011 a 9:06 . .
Must try this! absolutely love it!
http://www.annawithlove.com
Courtney Ann le janvier 23, 2011 a 9:15 . .
Lovely!!! I’m so doing this. It’s incredible.
I also love how you do your makeup and i just can’t perfect the cat eye…..perhaps in the near future you could do a tutorial on that as well? It’d make my life.
xoxo
Sam le janvier 23, 2011 a 10:09 . .
Amazing, shall definitely have to try it some time.. and get my hands on some drying drops!
Loving your ring.
pamela le janvier 23, 2011 a 10:21 . .
el hilo negro!! desde que vi tus uñas me han llamado mucho la atención y siempre me preguntaba como lo hacÃas, genial GRACIAS
diana le janvier 23, 2011 a 11:10 . .
great tip thank you for sharing :)
Kazuko le janvier 23, 2011 a 11:15 . .
fantastic! thanks for sharing!
Marloes le janvier 23, 2011 a 11:41 . .
I love how your nails look!
Dylana le janvier 23, 2011 a 11:42 . .
Love the nails! So beautiful!
xoxo,
colormenana.blogspot.com
Olivia le janvier 23, 2011 a 11:52 . .
Looks like Hedy Lamarr’s nails from the film Algiers (1938)
Timeless is more le janvier 24, 2011 a 12:24 . .
thank you that’s what i was waiting for!!!!
Participate at my Alexander McQueen Giveaway on my Blog! You have time until the 30 January!
Timeless is more: Alexander McQueen Giveaway
Olivia (Ã Paris) le janvier 24, 2011 a 12:33 . .
Ah yes merci Alix et Louise!!!!! Je vais essayer dès aujourdh’ui!!
genevieve @ oxalydes le janvier 24, 2011 a 12:50 . .
Très, très jolie leçon…
Mais c’est aussi une démonstration pour moi : je n’ai pas la patience de réussir ces effets !
Réservé aux plus soigneuses et douées d’entre nous !
POUPETTE le janvier 24, 2011 a 1:05 . .
merci infiniment pour cette astuce
Jocelyn Ng le janvier 24, 2011 a 1:08 . .
This is amazing!love it
Äervené rty le janvier 24, 2011 a 1:08 . .
amazing, i love it!
kiss xxx
julie le janvier 24, 2011 a 1:10 . .
nice ! I made my own nail tutorial. It works for a classic french manucure like for applying two colors. Have a look : http://redandsilk.blogspot.com/2011/01/how-to-make-french-manucure.html
sophie le janvier 24, 2011 a 1:18 . .
Merci pour le tuto!! effectrivement ça parait simple!
bonne journée!
La Petite Kaya le janvier 24, 2011 a 1:26 . .
Beauté absolue! :-)
Grace le janvier 24, 2011 a 1:28 . .
So amazing!
Grace x
secretly styled.
Luisa le janvier 24, 2011 a 1:43 . .
Wow pretty!
LAURE le janvier 24, 2011 a 1:44 . .
MERCIIIIIIIIIIIIIIII !!!!
Roxane le janvier 24, 2011 a 1:47 . .
C’est vraiment très astucieux ! J’ai hâte de pouvoir essayer ça ! merci
melissa le janvier 24, 2011 a 1:59 . .
Thanks for this tutorial, it’s so interesting! <3
http://www.abitoffashion.com
CamilleM le janvier 24, 2011 a 2:02 . .
Merci pour ce beau tuto :)
LittleRus le janvier 24, 2011 a 2:03 . .
You make it look super easy to do! :) Thanks for the tips. Also love your ring so much…. I posted about two similar rings yesterday, so if you like things like this, you may like my unicorn and ram babies. :)
Making Magique le janvier 24, 2011 a 2:18 . .
I was wondering how you did these! I was going to try the other day but couldn’t figure it out, but it’s actually so simple! Thanks so much for sharing this tip Alix! I love this look!
XOXO
mellow le janvier 24, 2011 a 2:26 . .
Merci pour le tuto, je vais essaier de suite !
MÃriam le janvier 24, 2011 a 2:34 . .
ME ENCANTAN!!
Jeanette le janvier 24, 2011 a 2:38 . .
Oh thank you. I always wondered how they did that.
La Femme Française le janvier 24, 2011 a 2:42 . .
Fabuleux ! Je vais le faire…
Merci !
Rene Braun le janvier 24, 2011 a 2:47 . .
Lovely!!! I’ve bought gold polish too! YOur manicure looks like chanel :))))
http://WWW.RENEBRAUN.COM
You are welcome to visit my blog too :)) Kisses!
And I love YOUR blog, you know it already xoxo
Pinupapple le janvier 24, 2011 a 2:49 . .
Je n’aurai jamais pensé à coller des oeillets, c’est très simple en fait (ou ça a l’air simple) ! Merci pour les conseils :)
Vivi.lesgamines le janvier 24, 2011 a 2:57 . .
c’est très astucieux ! ta robe qu’on aperçois a l’air très jolie, j’espère que tu nous la montreras dans un prochain post.
June le janvier 24, 2011 a 3:00 . .
That’s just lovely! I love it!
Nayara le janvier 24, 2011 a 3:40 . .
Thank you for sharing!… think i should try it at home. Love the colors you used on this tutorial. ;)
Raquel le janvier 24, 2011 a 3:53 . .
I’m gonna try it for sure! Hug from Brazil. Raquel
http://www.bomsensoemformadegente.blogspot.com
Juliiie le janvier 24, 2011 a 3:53 . .
Merciii pour le tutoriel ! Fantastique je vais essayer ça :D
deuxfillesenaiguilles le janvier 24, 2011 a 4:00 . .
Astucieux…
Michelle le janvier 24, 2011 a 4:01 . .
simply beautiful :)
cha le janvier 24, 2011 a 4:02 . .
je n’aurais jamais cru que c’était aussi simple! merci pour ces conseils!
Pollyne le janvier 24, 2011 a 4:08 . .
Merci merci et encore merci! Je me bats avec mes ongles depuis maintenant quelques temps et je me posais sérieusement la question de « comment elle fait?! »
Merci pour la simplicité du tuto et merci pour toutes tes publication, je les suit avec avidité.
becky le janvier 24, 2011 a 4:11 . .
This is so great!
Lnnn le janvier 24, 2011 a 4:22 . .
Vraiment magnifique !!!
Anna le janvier 24, 2011 a 4:54 . .
Je mourais de jalousie à chaque fois que je voyais une photo de ta magnifique manucure, et maintenant je peux la faire moi-même (ou essayer du moins) ! Merci :)
FunnyValentine8 le janvier 24, 2011 a 5:14 . .
Thank you so soooo much!!!!!!!!! I really wanted to ask you how you did your fantastic nails.. :) This is very useful! I’ll try that asap! xx
Boglarka le janvier 24, 2011 a 5:18 . .
Thanks for your tips! It’s really easy!
Clemence le janvier 24, 2011 a 5:29 . .
C’est fabuleux, merci beaucoup pour ce tuto .
Red Red Rose le janvier 24, 2011 a 5:56 . .
Écoute, je suis ravie. Je me demandais justement à Noël comment tu faisais et voilà , l’explication! Merci, c’est une super astuce pour des ongles beaux et originaux. Bises ; )
Leticherie le janvier 24, 2011 a 6:39 . .
Sympa !! c’est vrai que les oeillets c’est une bonne trouvaille !
Karolina le janvier 24, 2011 a 6:42 . .
I love that parfume in front, Eclat Darpege. Proffetional pictures! =)
Lux le janvier 24, 2011 a 6:48 . .
C’est vrai que c’est une super astuce! Le résultat est très sympa, très ludique : J’AIME!
Lux
http://luxbeaupre.blogspot.com/
Coralie le janvier 24, 2011 a 7:32 . .
Géniallissime comme article ! Je suis conquise :) !
Bonne continuation !
Gucci le janvier 24, 2011 a 7:39 . .
Thank you ! You’re so lovely !
xxxx Gucci
Priscila Kopke le janvier 24, 2011 a 7:54 . .
Hi,
i am Brazil. Love,love,love Thecherryblossomgirl! Look my blog, ok. Is Brazil looks : )
I am Rio de Janeiro.
xoxoxoxoxoxoxoxo, Linda!
Julia le janvier 24, 2011 a 8:31 . .
Great!
http://cappuccinowithfashion.blogspot.com/
Ally le janvier 24, 2011 a 8:33 . .
Merci pour le tutorial — je vais certainement essayer!
J’ai récemment trouvé un truc génial pour sécher les ongles rapidement: c’est mettre les vernis que je vais utiliser dans un bol d’eau super-chaude du robinet. Ils sont sec et inébranlables en 10 minutes ou moins après la dernière couche!
Maya le janvier 24, 2011 a 9:07 . .
Ah c’est extra, je me demandais comment faire ça justement! Je vais de ce pas essayer!
Merci beaucoup!
monse le janvier 24, 2011 a 9:42 . .
thank so much, it´s so original
xx, monse.-
http://elblogdemonsee.blogspot.com
Lizette le janvier 24, 2011 a 9:43 . .
Thanks for the tips! I can’t wait to try this!
http://bebopandbo.blogspot.com/
Eloise le janvier 24, 2011 a 9:48 . .
Aaah très bonne idée, je sais enfin ce que je vais faire de ma soirée. Demain je serais la plus belle… enfin mes doigts
Laura le janvier 24, 2011 a 9:48 . .
J’adooooooore!
Xx
Ninon le janvier 24, 2011 a 9:50 . .
Super ce tuto, moi aussi je vais essayer de m’en faire une.
A chaque fois je me rate et j’ai l’air ridicule, le coup des oeillets c’est une bonne idée !!
Siel le janvier 24, 2011 a 9:52 . .
awesome !
Car le janvier 24, 2011 a 9:56 . .
Dingue ! Depuis le temps que je me demandais comme tu faisais… L’astuce est géniale ! Merci à Louise et à toi pour ces découvertes !
Pauli R. le janvier 24, 2011 a 10:33 . .
Lovely and amazing! Thanks for the tutorial!
Margaux le janvier 24, 2011 a 10:42 . .
Je suis vraiment contente de savoir comment le faire !
Plus qu’Ã m’y attaquer :)
Merci pour l’astuce …
Bonne soirée,
M.
Lou le janvier 24, 2011 a 10:55 . .
J’ai regardé le resultat sans trop regarder les images plus hauts, et j’ai cru que c’etait les vernis d’YSL ca faisait comme sur la pub , c’est vrai que j’ai jamais pensé à faire ça avec mes propres vernis , c’est une idée sympa.
Noelle le janvier 24, 2011 a 10:58 . .
Great tip thank you!!
I’ll try by tomorrow, at the latest!!
I couldn’t help notice that you use Dr. Feelgood from Benefit, I also use it and I just adore it. Could you tell us some more make up tricks, which brands you use? I would love to know what’s your foundation, you seem to have a porcelain skin.
Thank you in advance!!
Love your blog!!
Julie le janvier 24, 2011 a 10:59 . .
Thank you for sharing! In the spirit of sharing, I was wondering if you could have a tutorial of how you make one of your pictures the color it is. I know you use the program analog program but a tutorial would make it so clear. Merci beaucoup!
Emily le janvier 24, 2011 a 10:59 . .
fantastic!
Elena Vasilieva le janvier 24, 2011 a 11:03 . .
great stuff, loved your tutorial
http://elenavasilieva.blogspot.com/
x
twenty something le janvier 24, 2011 a 11:16 . .
Adorable! C’est magnifique. Je voudrai essayer maintenant!
http://artfashiontwentysomething.blogspot.com
Camille le janvier 24, 2011 a 11:35 . .
Vraiment génial se tutorial ! Je vais m’empresser de m’acheter des oeillets !
Les photos sont très délicates !
Gros Bisous
mydailylittleinspiration le janvier 24, 2011 a 11:39 . .
Thanks so much for sharing! gonna try it out one day!
xx
http://mydailylittleinspiration.blogspot.com/
Renée le janvier 24, 2011 a 11:40 . .
Thanks for sharing! :)
the clothes paper le janvier 24, 2011 a 11:48 . .
Moi aussi j’utilise la fameuse technique des oeillets pour faire mes french ^^
Annie le janvier 24, 2011 a 11:59 . .
great tutorial. I love the colour combination. great idea.
X, Annie and stop by if you want to : anniewear
bell le janvier 24, 2011 a 12:04 . .
oooo love it!! i’m gonna have to try that!!
sophie tagel le janvier 24, 2011 a 12:16 . .
Merci pour ce cours. je l’avais vu sur Dita von teese, et je pensais que c’était trop dur. il ne reste plus qu’à essayer.
Kasia le janvier 24, 2011 a 1:39 . .
You have the most beautiful blog I’ve ever seen. I love every detail that you have created
julie le janvier 24, 2011 a 1:41 . .
I made a tutorial on my blog. I use nail stickers (speak about it). Have a look :
Annelie le janvier 24, 2011 a 1:55 . .
great tutorial, will try it some time, thanks ;-)
faraway le janvier 24, 2011 a 2:02 . .
J’ai bien envie d’essayer, ça n’a pas l’air si dur
Et le résultat est vraiment beau !
Martina le janvier 24, 2011 a 2:02 . .
Thanks for the tutorial! I surely try it, let’s see how it comes out :)
Kasia le janvier 24, 2011 a 2:12 . .
Your blog is the most beautiful I’ve ever seen. I love every detail of what you have created
jillian le janvier 24, 2011 a 2:17 . .
how fun! these are gorgous! xoxo jcd
Sequin Gown le janvier 24, 2011 a 2:24 . .
Oh, cool! Thank you for sharing!I will try it sometime!
mika le janvier 24, 2011 a 2:25 . .
great post!
http://mikasfashion.blogspot.com
Thea le janvier 24, 2011 a 2:39 . .
Looks so beautiful and cute!
kmqt le janvier 24, 2011 a 2:44 . .
Super tuto ! Pourrais-tu faire la même chose avec le chignon de ton précédent post ? :)
Mie le janvier 24, 2011 a 2:48 . .
Vraiment magnifique! Merci beaucoup Alix d’avoir partage ceci avec nous.
jeanne berre le janvier 24, 2011 a 3:01 . .
Fantastique l’astuce manucure, merci beaucoup.
Charlotte le janvier 24, 2011 a 3:02 . .
Superbe ! Merci Alix pour ce partage ! Cette manucure est tellement jolie !
ainsley le janvier 24, 2011 a 3:34 . .
Mercii bien ! J’essaie très bientôt à mon avis ;)
Sophie Mhabille le janvier 24, 2011 a 3:59 . .
Merci Alix pour ce secret girl, j’adore , oui c’est beaucoup plus simple que ce que j’imaginais
Mileide le janvier 24, 2011 a 3:59 . .
This very cool!!
Jaclyn le janvier 24, 2011 a 5:03 . .
Beautiful nails, can’t wait to try this! Thank you for the wonderful tutorial
Sabina le janvier 24, 2011 a 6:43 . .
I love that ring! And I’ve loved that dress on you since I saw it on you in that post where you’re wearing the thigh high boots with it. And thanks for the nail tutorial. I’ll try this trick. Dita Von Teese has done that look for years and I think it looks lovely.
http://mystylecanvas.blogspot.com
Anastasija le janvier 24, 2011 a 7:20 . .
Love these nails!
Alina le janvier 24, 2011 a 8:19 . .
ahhh!! Thank you, you just made my day :)
Theresa le janvier 24, 2011 a 8:51 . .
I love the nails! Thank you so much for sharing!!!
Theresa
http://www.theresaneef.com
Renée le janvier 24, 2011 a 11:25 . .
oh thanks for sharing!
Mamacita le janvier 24, 2011 a 11:33 . .
That is great!! You made it look like it is sooo easy!
http://blog-mamacita.blogspot.com/
Christine le janvier 24, 2011 a 11:33 . .
That’s a neat trick, now I know of a good way to use those nail stickers at home : )
http://porcelainfreckles.blogspot.com/
Jill le janvier 24, 2011 a 11:56 . .
Wow, your nails look awesome! Thanks for the tips, I will try this sometime =)
By the way, I’m giving away a fab MAC lipstick for Valentine’s day, you can win it! Details on my blog: http://www.jillpineda.blogspot.com
xoxo
Jill
Alexandrine le janvier 25, 2011 a 1:10 . .
OH !!!!!! Et dire que tout ce temps, je me disais que cette splendeur (la double manucure) n’était pas pour moi !!!! Merci, ô merci pour ce post !!! Tu as fait mon bonheur pour aujourd’hui (et pour longtemps, parce que je sens que je vais user et abuser de cette technique !!!).
Magnifique blog, je découvre seulement (bien que j’en aie déjà entendu parler) et je suis déjà fan !
Manja le janvier 25, 2011 a 1:33 . .
Trop, trop beau ! Merci beaucoup Alix !
yv le janvier 25, 2011 a 2:08 . .
gorgeous! thanks i never knew there were drying drops haha
momojae le janvier 25, 2011 a 3:01 . .
Cool!! Thanks for sharing!! I love it!!
xoxo,
http://momojae.blogspot.com
Emma le janvier 25, 2011 a 3:46 . .
Were do you get the paper hole stickers? I’m from Sweden, so maybe from a page that I can order from :) Love your blog, btw.
Love Emma
sophie le janvier 25, 2011 a 5:04 . .
mais 1000 mercis Alix !!!
je cherchais les autocollants adequats pr realiser la manucure vintage !
et jai jms penser aux oeillets !!!
super ! je vais de ce pas aller en acheter et le faire en blanc et rouge !!!
Vivian le janvier 25, 2011 a 5:43 . .
great tutorial, i will definitely be trying this (i’m glad other people asked because i always thought your nails were amazing and assumed you had them done somewhere)
myblissisthisway.blogspot.com
Aimée le janvier 25, 2011 a 5:55 . .
Spectacular
Amélie le janvier 25, 2011 a 6:46 . .
Chouette le résultat !
merci !
Connie le janvier 25, 2011 a 9:18 . .
Love the antler ring!
The Heartbreak
Martine le janvier 25, 2011 a 9:21 . .
maintenant la vie est plus facile!!! merci!!!
Tofu le janvier 25, 2011 a 9:26 . .
le résultat est impressionnant !
http://andthespidersfrommars.blogspot.com/
Lina le janvier 25, 2011 a 9:49 . .
Maintenant je pourrais me faire les ongles bien ! :P
♥ J’ADORE !
Louise le janvier 25, 2011 a 10:09 . .
J’adore cette technique ! Je vais m’empresser de l’essayer !
GALA le janvier 25, 2011 a 10:41 . .
J’adore tes petites astuces, Apres ton article, je me suis empressé d’acheter ces fameux petits oeillets !
Et j’aime ton Blog.
poison apple le janvier 25, 2011 a 10:46 . .
Merci beaucoup , justement je revais de me faire les ongle comme ca mais je savait pas comment faire …Très jolie couleurs de vernis aussi :)
Céline KG le janvier 25, 2011 a 10:55 . .
Merci pour la technique ! J’essaie des que j’arrête avec la peinture :D
xoxo, Céline
areyouincorrect.blogspot.com
Sam le janvier 25, 2011 a 11:16 . .
Merci pour cette tuto géniale! Ma soeur a essayé de suite peu après que tu l’aies posté, il me tarde d’essayer à mon tour!
http://sugarycarnival.canalblog.com/
Pauline le janvier 25, 2011 a 12:33 . .
Magnifique résultat ! Merci de l’info :)
Ines le janvier 25, 2011 a 12:59 . .
I’m so glad I stopped by!!! such an awesome post, thanks for the tips!!!
http://www.chezagnes.blogspot.com
martina Riedi le janvier 25, 2011 a 1:34 . .
that’s the perfect tutorial! i always thought how you do your nails, and now i can do it on my own ;) love it – thanks so much!!
Audrey Aegerter le janvier 25, 2011 a 1:43 . .
Je suis juste en train d’attendre que mes doigts sèchent. :) je me fais une petite manucure comme ci-dessus.
Bisous
Roberta R Sanches le janvier 25, 2011 a 1:48 . .
Oh, thanks god… I was crazy to discover that.
Petitmondebeaute le janvier 25, 2011 a 2:16 . .
Super astuce !! Je me suis toujours demandée comment réaliser une telle manucure, j’adore :)
Cat le janvier 25, 2011 a 2:29 . .
I read this blog all the time, and the first time I saw your nails I tried it on my own. I even figured out the hold punch rings as a trick too. Everyone loved them, and of course I told them I saw the idea on your blog! Now I experiement with all sorts of color combinations. Thanks for all the amazing inspiration!
Leah le janvier 25, 2011 a 2:49 . .
Bonjour, j’ai mis en place un concours sur mon blog, tu peut participer si tu veux !
Bisous, Leah.
http://hapiness-love-music.blogspot.com
Fräulein Catherine le janvier 25, 2011 a 2:55 . .
Just love the idea of your blog. xx
Fräulein Catherine le janvier 25, 2011 a 3:05 . .
I just love the idea of your blog. xx
alexandradr le janvier 25, 2011 a 3:16 . .
first time i visit u’r blog. Love it already, bloglovin it is!
maddiemudpie le janvier 25, 2011 a 3:29 . .
this is so pretty, i love your nails. deff a look i want to try.
Opaline le janvier 25, 2011 a 4:01 . .
tu as des mains hyper magnifiques et gracieuses
Le blog mode de Miss Zaza le janvier 25, 2011 a 5:06 . .
merci pour le tuto, la bague est magnifique !
Miss zaza
Georgia le janvier 25, 2011 a 6:16 . .
MUY BUENO,ME ENCATA
http://vidamodamundo.blogspot.com/
Emily le janvier 25, 2011 a 9:49 . .
Fantastic! I’d thought about your nails and how much I liked the look, but it never occurred to me to ask! So glad others did. Thanks for sharing.
jessica sommer le janvier 25, 2011 a 10:56 . .
Ugh, gorgeous! I love this. Thanks for the ideas!!
Aizen le janvier 26, 2011 a 2:45 . .
Alors, là , le coup du sticker c’est vraiment judicieux! Je n’y avais jamais pensé…Louise a une sacrée imagination.
Pour moi, se faire de jolis ongles m’a toujours paru comme étant un parcours du combattant! C’est long, il faut être précis, ça sent mauvais… ( > _ < )
Finalement plus tant que ça grâce à ton tuto! Je vais essayer de le mettre en application.
Pour des mains plus belles en 2011? Hihi…^^
Petite Patate le janvier 26, 2011 a 4:31 . .
Parfait ! Merci pour ce tuto :) j’ai hâte d’essayer ! C’est très joli.
Mila Rock Baby le janvier 26, 2011 a 5:10 . .
wow, amazing! i’m trying it today, thank you!
Lilsirene le janvier 26, 2011 a 7:27 . .
Merci beaucoup Alix pour cette idée bête comme chou et tellement ingénieuse! J’ajoute des oeillets à ma prochaine liste de courses et je vais tester cette manucure très sympa!
Lilsirene
MarlaH le janvier 26, 2011 a 8:05 . .
Waw. Superbes !
Merci pour ce partage !
emilie le janvier 26, 2011 a 8:25 . .
Merveilleux!
Et moi qui m’était embêtée à acheter les autocollants Mavala! J’adopte ta technique immédiatement.
Sherrie Cola le janvier 26, 2011 a 9:31 . .
Might have to give this a go!
Nicolas le janvier 26, 2011 a 10:04 . .
Beautiful colours!
http://artisnotdead.blogspot.com/
alice le janvier 26, 2011 a 12:51 . .
woooow! i love your nails!
… and you’re the best! i’m totally in love with your pictures! it’s like you are living in a dream!
Melanie le janvier 26, 2011 a 2:35 . .
Je viens a l’instant d’essayer. cest facile comme tout, de plus cest super jolie.
Merci pour cette astuce.
PS: si tu as en a d’autres, ca serai cool !
Melanie
Bett le janvier 26, 2011 a 3:01 . .
Thank you !
I was trying to find this.
Nicole Dao le janvier 26, 2011 a 4:46 . .
Love this tutorial! What are your other favorite color combinations?
Diana le janvier 26, 2011 a 10:14 . .
You´re background is so cute!
http://www.vamorelia.com
Melissa from bubbyandbean.com le janvier 27, 2011 a 1:11 . .
Beautiful!!! Thank you for sharing this!
anne le janvier 27, 2011 a 5:02 . .
genial!
tu n’en a pas d’autre a nous montrer,des tutorials?
♥
Becca le janvier 27, 2011 a 9:41 . .
Definitely going to have to try this!
Monica le janvier 27, 2011 a 10:39 . .
THANK YOU! THANK YOU! THANK YOU! for posting this!!!! I ‘m crazy about this trend but no idea how to do it , but now i know!!!! Thank you!!!!
~M
Classy & Fabulous
http://classnfab.wordpress.com
Annie Markantonatou le janvier 27, 2011 a 10:52 . .
thnks for this!
http://anmarkdesign.blogspot.com/
Lise le janvier 27, 2011 a 1:48 . .
C’est vraiment une super bonne idée j’adore l’effet rendu!
BIs
Lise
http://labulledelise.over-blog.com/
miryam le janvier 27, 2011 a 2:46 . .
ME ENCAAAANTA!!!!! MAÑANA MISMO ME LO COMPRO EN SEPHORA, SIEMPRE ME PREGUNTABA COMO SE HARIA LA MEDIA LUNA SIN SALIRSE…Y MIRA POR DONDE YA LO HE DESCUBIERTO. SOY DISEÑADORA TE INVITO A CONOCER MI FIRMA » » » DIME ROMEO » » EN dimeromeo.blogspot.com un beso desde SEVILLA , SPAIN, MUAAAAAAA
Emmeline le janvier 27, 2011 a 3:24 . .
Super! Il ne me reste plus qu’à m’acheter des oeillets et j’essaye dès ce week-end!
http://tachesdegirafe.wordpress.com/
Kaitlyn McCall le janvier 27, 2011 a 5:29 . .
LOVE LOVE LOVE this idea!!
I’ll definitely have to try it!
http://theurbanflamingo.blogspot.com/2011/01/vintagegiveaway.html
<3K
Alexandra le janvier 28, 2011 a 4:09 . .
where did you get those paper hole stickers??
Marie Vrignaud le janvier 28, 2011 a 3:59 . .
Je crois que ça va changer ma vie ! Merci !
:)
grace - stripes & sequins le janvier 28, 2011 a 4:33 . .
wow, this is amazing! thank you for sharing this clever trick!
Priska Araújo le janvier 28, 2011 a 6:31 . .
I was inspired by you, until it was right, lol.
http://www.priskaraujo.com/2011/01/meia-lua/
Congratulations Alix post.
Kisses!
Éléonore le janvier 29, 2011 a 8:35 . .
Moi, fan de vernis, je dis : MERCI !
Johanna le janvier 29, 2011 a 2:20 . .
thnx a lot!!!
Chloé le janvier 29, 2011 a 4:51 . .
Aliiix !
J’ai essayé =)
Je pense que je n’avais pas les ongles assez longs, pck c’était pas une franche réussite, ca faisait plutot french manucure, avec juste le petit bout vert. Mais je ne désespere pas, je vais persévérer, cela demande de l’entrainement!
Il faut que je me procure ces gouttes asséchantes magiques.
Merci en tout cas pour cette petite parenthese « trucs et astuces ».
Bisous Bisous!
Eve & Olivia le janvier 29, 2011 a 9:31 . .
Wow! Thank you for sharing this easy-to-follow and aesthetic tutorial. We’re definitely trying that out. Merci beaucoup.
Please visit our blog, it’s not much, but it’s up and coming :)
http://www.chiensatirique.blogspot.com
adele le janvier 30, 2011 a 12:45 . .
iLOVE! you’re so great! <33
xx
-adele
yougotsomestyle.blogspot.com
chatterbug le janvier 30, 2011 a 12:59 . .
i love your nails as well as the colors you used.
anonymouschatterbug.com
Zefy le janvier 30, 2011 a 1:58 . .
C’est magnifique!
These photos are extraordinary! The feminine tones are striking and romance is clearly a vital part of what makes this so professional but still approachable!
Can’t get enough!
xx
Danae le janvier 30, 2011 a 2:04 . .
I just found your blog and this amazing tutorial! I wanted to do this moonphase manicure for so long but I didn’t know how. Genious! Thanks
Kisses, Danae
isabelle le janvier 30, 2011 a 4:00 . .
Le vert du vernis et la robe à fleurs sont divins… Si en plus, il y a une bague « cerf » j’applaudis. Magnifique comme d’hab’
bubblegum le janvier 30, 2011 a 10:32 . .
géniaaal!!!mais est-ce que tu pourrais donner des idées d’associations de couleurs??parce-que je sais pas vraiment avec quels vernis le faire…merci en tout cas,et tu as des très très très belles mains!!=)
Eloïse le janvier 30, 2011 a 2:04 . .
J’adore les ongles bien faits! Et en particulier avec ce style rétro qui met en valeur la lunule! Très joli!
Laetitia le janvier 31, 2011 a 9:26 . .
Les couleurs sont super belles !!! ça m’inspire ;-)
Merci !
jenny le janvier 31, 2011 a 12:05 . .
c tres beau mais moi j y arrive pas deja pour maitre les oeillets droit c trop dur et apres le vrenis est tout pateu si vous pouvé me donné un truc pour que sa soit plus facile merci
brin de fantaisie le février 2, 2011 a 3:53 . .
Bravo. C’est un superbe tutorial. Les photos donnent de la poésie et une grande douceur à ce qui n’est, après tout, qu’une manucure ! En plus, c’est utile et d’ailleurs je vais essayer…quand bien même ce serait moins bien réussi que sur la photo. (@Jenny patience et choix de vernis sans doute ?)
Livia le février 2, 2011 a 5:30 . .
I loooove this tutorial!
I was always wondering how they do that…
And I did it on my nails today, using a dark beige and black. It looks awesome!
katoula le février 4, 2011 a 7:16 . .
Already tried it twice and love it! sooo easy! you can see it here:
http://redrosecheeks.blogspot.com/2011/02/inpiration-nails-tip.html
Thank you for the inspiration!
katoula le février 4, 2011 a 7:18 . .
Already tried it today and loved it! sooo easy! you can see it here
http://redrosecheeks.blogspot.com/2011/02/inpiration-nails-tip.html
Thank you for the inspiration!
Méa le février 4, 2011 a 11:41 . .
Haha, c’est exactement comme je fais !!! Merci les oeillets hein :)
Jessica Tapia le février 4, 2011 a 2:44 . .
I absolutely loved this nail tutorial!
I wanted to ask, which Sephora OPI nail polishes did you use in this tutorial? I don’t know if I’ve seen these shades. Thank you for your time!
-Jess ^_^
cee le février 5, 2011 a 1:42 . .
J’ai testé mais les oeillets on enlevé la premiere couche de vernis.. j’ai essayé de rattrapper le coup comme j’ai pu et le resultat etait pas mal! Mes copines sont fans!
Dommage quand meme, les oeillets pas pratiques qui enlèvent la premiere couche ou laissent de la colle sur les ongles.. Si quelqu’un a des astuces, je suis preneuse!
Paula le février 8, 2011 a 1:31 . .
Eeehhh! thank you thank you! I’v been wondering how to do this for ages!
Paula le février 8, 2011 a 1:33 . .
Eeeh thank you thank you! Been wondering how to do this for ages!!
normalityandme le février 9, 2011 a 1:11 . .
love this look. so gorgeous. where can I buy these paper hole stickers?! dying to try this x
Caroline le février 10, 2011 a 7:27 . .
Hahaha!parfait!!!il fallait y penser!
CG MAKE UP le février 17, 2011 a 7:33 . .
LOVE IT!
XOXOXOOX!
THAKS FOR GIVE US THIS KIND OF MAGIC!
FROM NOW I FOLLOW YOUR BLOG!
I HOPE THAT YOU´LL VISIT ME SOON !
BYEEEEEEEEEEEEEEEE!
CG MAKE UP! le février 17, 2011 a 7:35 . .
THANKS FOR THAT !
GREAT IDEA!
LOVE IT!
ILL FOLLOW YOU ..
BYEEEEEEEE
Thresa le mars 8, 2011 a 12:01 . .
I love this tutorial that I put a link to it on my blog (blog.esthersnc.com). I hope my readers will think the same. Thank you for the tutorial.
Thresa le mars 8, 2011 a 12:03 . .
I love this tutorial that I put a link to it on my blog. I hope my readers will think the same. Thank you for the tutorial.
lola le mars 17, 2011 a 12:27 . .
C’est vraiment sympa de partager ce genre de petits secrets avec ceux qui aiment ton style au lieu de les garder égoïstement pour toi ! Merci !
Laura Crafty Bird le avril 4, 2011 a 3:49 . .
Thanks for sharing! I have been trying to play around with this idea for ages- the hole punch stickers are a genius idea! I am now typing this with beautiful fingers nails ( I have gone for seaside inspired colours after my trip to Brighton). x
Marie le avril 14, 2011 a 9:22 . .
Merci, Super astuce ;)
Lily le mai 25, 2011 a 9:25 . .
Is the green color Sephora’s Opi « Leaf Him at the Alter? » or the Teal? The green one they have has gold simmer inside but the one here looks much darker.
Erly le mai 31, 2011 a 3:24 . .
Hi, I love the colors that you used. May you please let me know the name of the sephora nail polishes you used ?
louise le décembre 5, 2011 a 4:38 . .
Merci beaucoup pour ton astuce mais je ne comprend pas parce qu’avec moi sa ne donne pas un aussi beau résultat… Peut etre parce que mes vernis sont de mauvaise qualité….
Dommage
fanny le octobre 23, 2012 a 9:35 . .
ou trouve tu le vernis seche vite de topcoat ou tes gouttes assechantes??? Merci en tout cas cest un super assemblage de couleures